The Sides
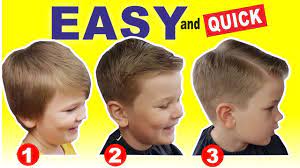
Cutting your son’s hair at home is an efficient, time and cost-saving option that saves both trips to the salon as well as money! By using proper techniques and clippers, you can give your little one a great-looking haircut every month.
As soon as you’re ready to cut, decide where the top will connect with the sides and back. A common choice may be around the occipital bone (rounded part). But this decision ultimately depends on your desired style.
Trim around his ears by folding down each ear and cutting around it using your clippers, using your guide as a reference point. This will prevent cutting too deeply into his sensitive skin. Continue trimming around his ears until you reach the desired length for his remaining head hair before moving on to another side and repeating this process until all sides of his hair have been cut to your satisfaction.
The Top
While most boys’ haircuts require clippers to fade and blend the sides and back, it may be possible to use clippers on top depending on style, hair texture, and length of their locks.
Corsillo suggests using a plastic guard (3 is ideal) on the clippers and cutting straight up from the base of the neck. She advises comparing each line’s height against that of its predecessor so as to achieve a balanced, even look in overall appearance.
Once you’ve cut to your desired level on the top of the head, decide where you would like to stop using clippers and switch over to scissors. Some parents prefer stopping right above the occipital bone; marking this area with a washable marker or simply being consistent in where you decide to stop using clippers on top may help with consistency.
The Back
Haircutting boys is more complex than cutting women’s due to the different styles, textures, and lengths present. But with the proper clippers (and some patience), it can be achieved efficiently at much less expense than paying a salon for professional cuts.
To achieve most styles, you should fade and blend the back and sides with a longer top. This can be accomplished using scissors or combs; however, for beginners, using clippers with built-in attachments is much simpler.
Start by attaching a plastic number 3 guard to the clippers and holding them at an acute 90-degree angle at the base of hair, moving upwards in scooping motions from there. Keep repeating this all around your head, adjusting the guard as necessary until the desired length is reached. Trim around ears, but be careful not to nick their earlobes here too. Now it’s almost finished; the final step will be dampening and tidying any unruly strands with scissors!
The Neckline
The neckline is where hair meets the head. To effectively cut around this area, take great care in cutting with gentle movements – for best results use an ear as a guide and comb down hair accordingly to follow its natural line.
Once the neckline is finished, begin by starting at the back and moving upwards, gradually switching to longer guards as you progress.
As soon as you reach the top of his head, use a shorter guard to trim off any unruly hairs that may be sticking out or making his forehead appear too long. Repeat this step as needed until you are pleased with the result – now your child can get a great-looking haircut without spending tons on salon visits every month!